Wednesday, November 30, 2011

FMS13: Square Leaves


Time for another fun sketch from Freshly Made Sketches!    Lesley is our hostess this week and has challenged us with the awesome sketch!  The possibilities are endless as you can see from the samples from the design team.   I hope you'll find a bit of time to play along!


Are you confused?   I've been having a horrible time dealing with the holidays these past few weeks and I think that might be a part of why I haven't had any desire to stamp.   When I sat down to make my card for this week, I gave myself permission to make whatever came to mind, even if it was totally the wrong season.    My Spice Cake paper and Gently Falling stamp set are two of my favorite products, so I grabbed them, hugged them, and got to work.   While it is still not a masterpiece, I actually like it.   Well, minus the crooked sentiment. Don't you hate when you get to that last step and mess up?   I even used my stamp-a-ma-jig!   I think I was just tired by the time I finished and my eyes were crooked.   :)   

I hope you'll go check out the blog and see all the other gorgeous samples that the design team created to inspired and motivate you.  I can't wait to see what YOU create!

Monday, November 28, 2011

Room Makeover

While I haven't been stamping too much, I did get to redo my room a bit over the past few weeks.  It is much nicer to work in there now.   I feel like everything finally has a place!   I still need to get some baskets and bins for my shelves, but it feels like it is really starting to come together.    

This is the most popular area of the room.   My three furries battle over who gets the luxurious window seat.    Bandit usually wins of course.  :)

The Big Shot station is still in the same spot.  Nothing too exciting there.  It is fun to see my collection of dies grow each time I take new pictures.  :)   My birthday is coming up next month and it will be growing again when use my awesome Stampin' Up! birthday discount to get the Tasteful Trim die!  

My punches!   I might need to rethink this as my rack is a bit full.  I'll probably just lose the non-SU ones as I never use them them anyway.   There's always the back side of the door too, right?  

My bookshelf needs some work, but at least it looks semi-organized for now.   It was crowded and a hot mess!

My favorite part of the room, my stamps!   I can't seem to part with my retired ones, so there is a mix of current and retired on my shelf.   I still have way too many, but I'm trying to do better about that.   Lately my purchases have been Big Shot dies, accessories, or ink/paper to finish off my color family collections.  

Here's my desk with a card in progress.  I love that I can work neater now that things have a place to go!   I tried to keep the stuff I used a lot (ink pads, stamps) near my desk so that I can put them back right when I finish with them.  I also love having my computer/TV monitor right on my desk.   My awesome husband got that for me last year and it is great.   

Finally, all my new shelves that make up the other side of the room.   Bella is on her way to fight for the window seat or claim the bit of sunshine that's on the floor.   :)   I love these shelves from Target!  I have 3 large ones and one small one now and they are just perfect.   They just need some baskets and should be perfect!  

Anyway, just thought I'd share that.   I hated my room for ages and this has really helped.   All I did was purchase 3 new shelves and rearrange a bit.  I think it looks like a real craft room now!   I just need to work on decorating the walls a bit and figuring out exactly where to store everything so that I can work efficiently.  

Sunday, November 27, 2011

Elegant Elizabeth

Here's another card we made at my last class.   I thought it would be work for different occasions, including a wedding or birthday.  (and yeah, black and white cards NEVER photograph well...sorry!)   I love the Elizabeth stamp; it is so elegant and I think all the sentiments from Teeny Tiny Wishes will fit in the oval.   We embossed it with black embossing powder and added some spritzing before matting it on a torn piece of First Edition designer paper.   Some pearls and black satin ribbon were the perfect embellishments to finish it off.

I apologize for my lack of posts recently.  I haven't been feeling that great due to the weather changes.   Every front that blows in seems to bring along whatever it is I'm allergic to.   The constant sinus headaches have just worn me out.   I hope that's what is wrong with my creativity; I haven't made a card that I truly love in a while now and it is a bit depressing.   Do you go through that?   I keep hoping for a break from exhaustion and headaches along with the return of my mojo.   I should get some new Valentine's Day stamps in this week, so maybe they will be the thing I need to get back on track.
Have a wonderful week!   Don't forget the Online Extravaganza is still going until the 30th.   There are some great stamp sets on sale for 50% off and a nice bundle of heart/love stamps/wheel that would be perfect for getting a head start on your Valentine's projects.

Friday, November 25, 2011

FM34: Chocolate Christmas


Here is the "Mashup" Challenge :
  1. Make a project featuring "A Christmas Theme".
  2. Or Make a project using the colors "Aqua, Chocolate and White".
  3. Or "Mash it Up" and create a "Christmas themed project using the colors Aqua, Chocolate and White".

First, I apologize for the late post today!   For some reason, my scheduled post disappeared!   I can't find it anywhere on Blogger, so I have no idea what happened.   Hopefully I didn't create it on the wrong blog or it end up double-posting on this one.   Very weird!  

Anyway, the challenge for The Friday Mashup is a fun one this week!    I love any excuse to pull out my Holiday Happiness set and I thought it would be perfect for this challenge.   I don't know why I love this set so much.  Maybe it reminds me of the infamous Charlie Brown Christmas tree?  :o)    To give a bit more interest to my card, I added some bling in the form of Dazzling Diamonds and Basic Rhinestones.  

I hope everyone who celebrated had a wonderful Thanksgiving!   We had a great day full of good food and good friends.   I'll try to post a few pictures later this weekend.   If you are out in the Black Friday madness, stay safe!   I'm heading back to bed with my kitties for a bit more sleep!   

Wednesday, November 23, 2011

FMS12: Gentle Spice


It is Wednesday and time for a new sketch from Freshly Made Sketches!   Jen created this gorgeous sketch for us to work with this week; isn't it awesome?!   I hope you can take a break from the turkey and bargain shopping to stamp along with us this week!

Here's what I came up with for this week.   Now to be honest, I don't love it.   I think I should have used MUCH LESS Soft Suede or something.  I do love parts of it, like the Spice Cake designer paper and the leaf from Gently Falling.   I just wish I could have showcased them a bit better.  I'm just starting to experiment with circles on my card, so hopefully my next attempt will work out a bit better!  

Be sure to stop by and see what the rest of the design team has created to inspire you this week.   I promise they did a much better job than my poor card!   :)

For all my American friends, have a safe and happy Thanksgiving!   We already started preparing some of our goodies today and I'm so excited!   

Monday, November 21, 2011

Simple Gently Falling


I thought I'd share another card we made at my last class.   I LOVE this one because it combines so many of my favorite things...Gently Falling, woodgrain paper, baker's twine, and embossing!    I love how simple it is even with all those elements!   This is a color combination I've used before and one I will definitely be using again; I just love how it looks!

Stamps:  Gently Falling, Teeny Tiny Wishes
Ink:  Early Espresso, So Saffron, Calypso Coral
Paper:  Early Espresso, So Saffron, Calypso Coral, Whisper White, Frostwood Lodge
Tools/Accessories:  Big Shot, Stripes embossing folder, Early Espresso Baker's Twine, color spritzer tool, paper snips

Visit my store today to get some great deals from Stampin' Up!   The awesome Simply Scored tool and the fun new Sweet Pressed Cookie stamps are 20% off until midnight tonight!    

Other great deals include fabric at 60% off, some stamp sets at 50% off, and even an awesome Big Shot die at 20% off!    Check out the flyer here with the complete list and discounted prices!   Happy Shopping!  

Sunday, November 20, 2011

PP 73: Silver Tree


I have the privilege of substituting over at The Paper Players challenge this week!    I love these ladies, so it is always a thrill when I open up my email and see that I get to play along.   Jaydee has a gorgeous color challenge for everyone this week.   I think this is one of my favorite combinations for elegant Christmas cards. There's just something about blue and silver that I love!  


I decided to show another one of my older, but still current stamps a little love for this one.   Season of Joy was one of the very first sets I ever purchased and I still adore it.   I did have to pull out some retired ribbon as I didn't have any current Night of Navy ribbon.   I love the 1 1/4 striped ribbon and think it looks great used as a divider like this.  I'm definitely using this layout again for more cards!    The sentiment is from another current stamp set, Contempo Christmas.  

I hope you enjoyed my card for today.  Hop over to the Paper Players to see what all the other designers came up with using these gorgeous colors.   I know this week will be a busy one with the holiday, but maybe you can find a bit of time to escape to your crafty space and play along.   

Stamps:  Season of Joy, Contempo Christmas
Ink:  Night of Navy, Versamark
Paper:  Night of Navy, Brushed Silver, Shimmery White
Tools/Accessories:  Big Shot, Snow Burst embossing folder, Regals buttons, Night of Navy 1 1/4 striped ribbon, white baker's twine, Silver embossing powder, heat tool, embossing buddy, basic rhinestones

Saturday, November 19, 2011

PPA120: Faux Linen Sketch

Sketch
So lately I've been feeling pretty down and not really enjoying stamping as much as I usually do.  My cards are all feeling a bit plain and boring for me too.  Sad face, right?    Today I found myself a bit ahead of things, so I decided to sit down and do a challenge for fun.   I wanted to add a new technique into the mix as well.   I find that expanding my skills and trying new things a breath of fresh air, so I thought that might be just what I needed.   I decided to play along with the Pals Paper Arts sketch and to try the Faux Linen technique.   I haven't used my new Distressing Essentials kit very much yet, so it was a perfect time to put it to use!  

I used the Tea Stain ink on my image panel and I don't think it was quite dark enough to allow the linen texture to show up in my picture.  I know next time to go darker for that part, but I do like how the card turned out.  I seem to be drawn towards browns right now; maybe because of all the dead trees we have from the drought?   Or maybe cheery colors just aren't fitting my mood?   Either way, I do like mixing them up.  I never thought I'd be using Soft Suede as much as I have been!  It is a bit of an ugly color.  :)  All the panels are sponged to give them some depth and I pulled out my favorite retired ribbon, Early Espresso satin.  

Stamps:  Best Friends Forever, Nature Walk, En Francais
Ink:  Soft Suede, Early Espresso, Tea Stain distress ink
Paper:  Glossy White, Soft Suede, Early Espresso, Neutrals Patterns DSP stack
Tools/Accessories:  Distressing Essentials kit, sponges, Early Espresso Satin ribbon

Online Extravaganza!

Here's another card we made at my all occasions class last week.   I think this is one of my favorite color combinations!   It is perfect for a masculine card of any type, even baby cards!    Paired with Circle Circus, it can become whatever type of card you need!    Just change out the sentiment for the occasion you need!

Stamps:  Circle Circus, Perfectly Penned
Ink:  Marina Mist, Wild Wasabi, Early Espresso
Paper:  Marina Mist, Wild Wasabi, Early Espresso, Whisper White
Tools/Accessories:   Big Shot, Stripes embossing folder, Marina Mist 3/8 taffeta ribbon (retired)

On Monday, November 21st, Stampin' Up! will be kicking off an exciting online extravaganza!   If you remember last year, there were some great deals and sales, so don't miss out on this!   This time there will be a 24-hour only sale from November 21, 12:01 AM - 11:59 PM (Mountain Time, so be sure to adjust for your time zone!) on two items!

The rest of the sale will run from the 21st until the 30th.   Some hints of the deals to come:
*Free digital downloads valued at $40 when you purchase My Digital Studio Express
*60% off select designer fabrics
*30% off an exclusive ribbon bundle

I'll have more information on Monday, but you can find the deals starting at 12:01 AM (MT) in my online store!   

Friday, November 18, 2011

FM33: Shabby Owl

So here is the "Mashup" Challenge :
  1. Make a project using "Paper Rosettes".
  2. Or Make a project using "the Sketch Above".
  3. Or "Mash it Up" and create a "Project with the Sketch using Rosettes".
* Here are some tutorials on Paper Rosettes if you aren't sure how to make one.


It's Friday, so time for another fun Friday Mashup challenge!   I'm sure you noticed that everything is NOT coming up rosettes on my card.  Guess who can't make a pretty rosette?    Yep...it is that same person who also has a few attempts in their trash.    I am officially THE WORST rosette maker in the world!  Well, I did get one to turn out, but of course it was the one on my practice paper.  lol    I don't like being defeated by paper (or in this case, GLUE!), so I'll keep working on them!

My friend Linda inspired me to finally use my designer frames embossing folder this week.  She says it looks like a turkey platter, but don't tell my owl!   The rest of the card was inspired by another good friend, Ann.    When I see where I am now in my paper crafting and on design teams, I do credit much of that back to her.  Just following her blog really pushed me to try harder to make better cards and do the challenges that I so enjoy.   You can see her influence here with the distressed layers and pearls!   :)    I picture this card being perfect for someone going for a shabby chic nursery; it has that look, right?   

Wednesday, November 16, 2011

FMS11: The Open Sea

Wow! Where has this week gone already?   I can't believe it is already Wednesday!    You do know that that means though!   Time for a new sketch from Freshly Made Sketches!   My awesome friend Linda designed the sketch for this week.   Isn't it a cool one?   So many possibilities!   I pulled out one of my favorite sets, The Open Sea, because I just knew it would be PERFECT for this layout!  
See what I mean?  PERFECT!   Now this stamp set is still available, but if you missed out on the gorgeous matching paper, you can only find it on My Digital Studio.   I'm a bit sad about that as I love them together and should have bought an extra pack or four.   :)   You will be seeing some retired stamps and paper on here for a bit as I'm trying to be a good girl and use up some things.  I reorganized my room and found lots of goodies that need some love!  

I hope you'll go check out the rest of the samples from the design team and start thinking up some ideas for your own card!

Stamps:  The Open Sea
Ink:  Crumb Cake, Not Quite Navy
Paper:  Not Quite Navy, Cherry Cobbler, Whisper White, Nautical Expedition (retired)
Tools/Accessories:  Dotted Scallop Ribbon border punch, Regals buttons, Cherry Cobbler baker's twine

Tuesday, November 15, 2011

colourQ 111, PPC41


I finally managed to clear off my desk and stamp today!    Yay!   My sweet friend Lesley is a guest designer this week over at Scrapbooker's Paradise, so I decided to try their sketch with the awesome colors from colourQ this week.  I thought they worked very well together and I love how my card turned out.  I have been on a mission to make sure all my stamps are feeling loved, so today I used a retired set from the Summer Mini that I hadn't inked up yet.    Now I'm sure you've never done this, but I thought I'd share how silly I am sometimes.  I loved this set, but never had an order large enough to earn it.   The day before the catalog expired I totally panicked at the idea of never owning it and put in an order to get it.   It has sat unloved since I got it, so I don't know what I was thinking!  :)

Stamps:  Love & Care (retired)
Ink:  Pear Pizzazz, Pumpkin Pie, Rich Razzleberry, Versamark
Paper:  Crumb Cake, Rich Razzleberry, Pear Pizzazz, Pumpkin Pie, Whisper White, Bright DSP stack, In Color Hostess stack (retired)
Tools/Accessories:  Big Shot, Fancy Fan Letterpress Plate, Beautiful Wings embosslit, Itty Bitty punch pack, Dotted Scallop Ribbon border punch, basic pearls, Rich Razzleberry 3/8 taffeta ribbon (retired)

Monday, November 14, 2011

Just Believe class card


Today I thought I'd share one of the cards we made last Friday night for my Girls Night Out class.   I think this was my favorite!   I took an idea from the Idea Book & Catalog and turned it into this beauty!   I love purple and green together; it is such a lovely combination.   Just Believe is a gorgeous set and you can do so many pretty things with it.   I'd highly recommend you put it on your wishlist if you don't have it already!

Before I go, I'd like to wish my sweet friend Anne Marie a very happy birthday!   I was hoping to make a card and post it today for her, but my poor room is in shambles.   I have been buying new shelving and reorganizing for a few days now.   We are supposed to have a rainy day tomorrow, so I hope it will be the time I need to finish up in there!

Stamps:  Just Believe, Tiny Tags
Ink:  Concord Crush, Lucky Limeade
Paper:  Concord Crush, Wisteria Wonder, Lucky Limeade, Whisper White
Tools/Accessories:  Big Shot, Square Lattice embossing folder, Beautiful Wings embosslit, jewelry tag punch, blender pen, Lucky Limeade ribbon, basic pearls
 

Sunday, November 13, 2011

colourQ 110: CAS Leaf


Aren't these colors lovely?    I have to say, those cookies made me a bit hungry too!   For my colourQ card this week I decided to go clean-and-simple.   When you look at it, you're probably going to think it took minutes to make.   I wish!   For me, the simple cards are the most difficult!   Every detail of this type of card must be perfect and the spacing must be exact in order for the card to look right.   I think I had to redo this one a few times before I got it where I liked it.  


I have to say, I do love how it turned out.   For the background behind the leaf, I used  Pool Party ink and one of my clear blocks and the A to Z background stamp (stamped off once).   It gives a nice, but subtle frame for my gorgeous leaf.   The leaf is inked with Peach Parfait and then rock-n-rolled in Cajun Craze (the closest color I had to Dusty Durango).   I did this twice and cut them both out and layered them for a bit of dimension and interest.   The sentiment is inked with Soft Suede.  I hope you like it and will try your own CAS card soon!  

Stamps:  A to Z, Gently Falling, Thank You Kindly
Ink:  Pool Party, Peach Parfait, Cajun Craze, Soft Suede
Paper:  Naturals White, Soft Suede, Pool Party
Tools/Accessories:  clear block, paper snips, stamp-a-ma-jig

Friday, November 11, 2011

Cookin' with the Players


Anne Marie has a fun recipe challenge this week at the Paper Players.   It definitely requires some thinking, but that's why we call it a challenge!    Now I've been prepping all day for my class tonight, so my brain is tired!   I also had everything all set up, so I was limited in both brain power AND supplies for this one.  I pulled together what was left in my craft room and here's the result:


I did cheat a bit and use the sketch from Freshly Made Sketches.  I couldn't figure out how to get the mix of designer papers to work any other way!   I told you my brain was tired!   I got a new color of card stock in my order last night, Pink Pirouette, so I had to make something with it.  It wouldn't be an Anne Marie challenge without pink.  :)     I love pink with black, but I thought it would also look good with the black and gray mix.   For my ribbon I used some black satin to make a little flag and some gray taffeta my flower accents.  My glitter is on the silver glitter paper AND the glimmer brad; I love sparkle!   The punch comes from the circle punch used for my flower center.  So...I think that's it!   

You still have a little time to go cook up your own card, so go get busy!  

Friday Mashup Debut!

I'm so excited to announce that I've been asked to join the wonderful design team over at The Friday Mashup!     This week Kasey has challenged us to make a girly card, use our favorite technique, or mash it up and use our favorite technique on a girly card!   Did you get all that?!   :)    I decided to go with some girly colors and practice a bit more on my vintage/aging techniques.   


What do you think?   Girly, huh?   I love it!   I'm not that into pink, but I do love Blushing Bride, especially paired with Early Espresso!  I did a lot of sponging on this one.  I think I got every edge of all the pieces of card stock in fact!   I also added ink to the raised areas on my embossed panel to make it stand out more.    Once I finished, I gave it a good spritzing with my homemade shimmer mist!   Girly cards need a bit of sparkle, right?   :)

Stamps:  En Francais, Teeny Tiny Wishes
Ink:  Soft Suede, Early Espresso
Paper:  Early Espresso, Soft Suede, Blushing Bride, Very Vanilla
Tools/Accessories:  Big Shot, Vintage Wallpaper embossing paper, Fun Flowers die, Word Window punch, Modern Label punch, basic pearls, Early Espresso satin ribbon (retired)

Be sure to drop by the Mashup! blog and see what all the other lovely designers have created to inspire you this week!

Wednesday, November 9, 2011

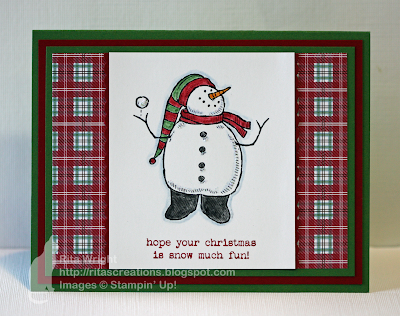
FMS10: Snow Much Plaid


It's Wednesday, so you know what that means!  A new sketch from Freshly Made Sketches.  Now this is a special sketch because it is MINE!    :)   Lesley turned us loose and let us design some for the blog.   Scary, huh?   I actually loved making up a few and I hope you'll enjoy playing along with us!


The fun thing about sketch challenges?   Flipping them and interpreting them for your idea of course!  :)   I had this stamp set and paper on my desk when I started thinking about my card and if you own it, you know it is hard to say no to that adorable snowman.  He wanted to be on my card and I was helpless to say no.   He also wanted to sparkle like Edward, but as always it just doesn't show up in the picture.   I guess I was in one of those layering moods when I made this one.   I do love me some layers...just not the cost to mail them!    Definitely a clean card, but not too simple with all the layering.   I hope you like!   I also hope you like my sketch and will come play along!  :)

Stamps:  Snow Much Fun
Ink:  Staz On Black, Garden Green, Cherry Cobbler, Pumpkin Pie, Basic Black, Bashful Blue
Paper:   Frostwood Lodge designer paper, Garden Green, Cherry Cobbler, Whisper White
Tools/Accessories:  Dotted Scallop Ribbon Border Punch, blender pen, Dazzling Details

Tuesday, November 8, 2011

Bright Hopes for Club


I have stamp club on Thursday and needed another project for it, so today I came up with this one.   It's similar to one I'd made before, but I went with more traditional colors, added a bit of bling, and changed the ribbon to the gorgeous red satin.  Instead of embossing the image, I stamped it twice and cut out one to get some dimension.   Now I initially didn't do that, but when I showed the card to my husband he said it needed dimension.  :)   He has a good eye, so back to work I went!   I hope the ladies will enjoy making this one.   This set is one of my favorites and I can't wait to share it with them!  

I did try setting up a little station to take pictures after dark, but I see that my Garden Green card stock looks more like Wild Wasabi.   Back to the drawing board on that I guess!

Stamps:  Bright Hopes
Ink:  Real Red
Paper:  Real Red, Garden Green, Whisper White
Tools/Accessories: Big Shot, Vintage Wallpaper embossing folder, Frost White shimmer paint, Real Red Satin ribbon, Basic Rhinestones

Sunday, November 6, 2011

Gratitude


After a pretty crappy day yesterday, I decided to go play in my stamp room a bit before I went to bed.   Making a card is the perfect cure for the blahs!   I wanted to play along with a couple of challenges, so I decided to combine the Pals Paper Arts color challenge to use River Rock, Soft Suede, and Early Espresso with the Friday Mashup challenge to make a Thank You or Gratitude card.

Now I make a lot of cards and I like some of them, LOVE others, and hide a few too.   This card is one that I LOVE and I'm amazed at how well it turned out!   I have been trying to use some stamp sets that have collected a bit of dust, so that's where I got the Vintage Vogue inspiration.  I wasn't sure about brown flowers, but I am in love with them!   I think this card will go in my "I'm keeping it forever" stash.  :)    Now it is an overcast day here in Texas, so my photo truly doesn't do this one justice.  I tried different locations and different lighting, but it just wasn't happening today.   I really need to get that light tent ordered!

Happy Sunday!

Stamps:  Vintage Vogue, Petite Pairs, En Francais
Ink:  Soft Suede, Early Espresso, River Rock
Paper:  Soft Suede, Early Espresso, River Rock, Very Vanilla
Tools:  Big Shot, Scallop Circle #2 die, circle punches, paper snips, Basics glimmer brads, Early Espresso satin ribbon (retired)

Saturday, November 5, 2011

Pink and Orange Friends

I'm having a fun play day today, so I was able to do a couple of fun challenges!   For this card, I combined the color challenge from Stampin' Royalty with the sketch challenge at Create with Connie and Mary.  I think it turned out pretty cute.  Those colors just screamed teen girl to me, so I tried to make a card appropriate for one.   After not liking this stamp set, I've managed to use it two days in a row!

Stamps:  Best Friends Forever
Ink:  Melon Mambo, Blushing Bride
Paper:  Peach Parfait, Melon Mambo, Blushing Bride, In Color DSP stack (retired)
Tools/Accessories:  Itty Bitty Punch Pack, Paper Snips, Basic Rhinestones, Melon Mambo scallop dots ribbon

Drum Roll please....


The Random Generator picked #56 for the winner of my card for last week's blog hop!
LILIANA said...

Two very cute projects! Love that dsp. Thanks for sharing.
Liliana, if you email me your address, I'll get this out in the mail to you! 

Friday, November 4, 2011

colourQ 109: BFF


I didn't think I was going to get anything made for this week's colourQ challenge, so this post is a bit of a miracle.  :)   I worked on ideas for hours yesterday and couldn't get them in the right combination to look right.  I LOVE anything with a retro feel, so I was very disappointed in myself.    I failed miserably at the challenge AND the new recipe I tried turned out horrible and had to be thrown out.  

This morning I woke up determined to have a better day and headed off to my room to make something for the challenge...successfully this time!    I put aside everything I had tried yesterday and started fresh.   I grabbed a stamp set I hadn't used yet and started putting together different ideas until I finally felt like I had something I could actually post!   (I also made pumpkin bread today to make up for yesterday's recipe disaster.  I hope my club ladies will like it tonight.)


Now of course I made something that was difficult to photograph!   :)   I finally used the Best Friends Forever stamp set that we received at Convention back in July.   It is not once that I would have normally purchases, but since I had it, I thought I'd try inking it up.   I also had to add some Fun Flowers from my favorite die.  I hope you enjoyed my card and will give the colors a chance to work for you!

Stamps:  Best Friends Forever
Ink:  Soft Suede, Island Indigo, Pumpkin Pie, Cherry Cobbler
Paper:  Island Indigo, Pumpkin Pie, Soft Suede, Whisper White
Tools/Accessories:  Big Shot, Fun Flowers die, Stripes embossing folder, Dotted Scallop Ribbon border punch, Brights buttons, Cherry Cobbler Baker's Twine, Pumpkin Pie satin ribbon (retired)

Digital Scrapbooking Celebration!


Dates: November 4-7, 2011

Celebrate Digital Scrapbooking Day with Stampin' Up! for a four-day online event designed to introduce more of you to our digital content.  Digital Scrapbooking Day is November 5, but we'll keep the celebration going from November 4-7! The event will include free downloads, blog posts with exciting project ideas all weekend long, and the announcement of the 2011 My Digital Studio Contest winners.

Visit MyDigitalStudio.net to get these free, fun new downloads and find out more about the My Digital Studio program!

Brand-new, never seen before FREE downloads include:
I have found many uses for My Digital Studio and find myself opening it up for so many things!   It will help you design wonderful gifts, make flyers or signs, scrapbook your memories, and let you print out images that you can use on traditional paper crafting projects!     If you'd like to learn more about it, please contact me today to arrange a time to come over and play!  

Thursday, November 3, 2011

Hostess Club Card #2


This beauty is the second card we'll be making at my stamp clubs this month.   Isn't it pretty?!  I am such a big fan of Lovely as a Tree.   One of the ladies in my Friday night group mentioned she'd like to try to the Crayon Resist technique so I decided to plan a card with it.   I love how it looks like snow!   I hope you can see it; I didn't want a lot of sponging on my main panel, but of course the more you add, the more the resist will stand out.   I'm really loving this combination of colors for Christmas this year.  I've never been a big fan of Wild Wasabi in the past, but I have to say, I love it right now!

Stamps:  Lovely as a Tree, Woodgrain
Ink:  Wild Wasabi, Garden Green, Early Espresso marker
Paper:  Wild Wasabi, Garden Green, Naturals White, Cherry Cobbler, Frostwood Lodge designer paper
Tools/Accessories:   white crayon, sponges, blender pen, Cherry Cobbler Baker's Twine

Wednesday, November 2, 2011

FMS9: Cherry Leaves


It's Freshly Made Sketches day!   Tui designed this fun sketch for us this week; isn't it cool?    Because it is a new month, we also have 2 new featured designers so be sure to stop by and say hello to Lauri and Christy.   


My take on the sketch uses my favorite new stamp set, Gently Falling and one of my favorite new color combinations.   Cherry Cobbler is so fantastic and by using it with neutrals, it really shines!   My friend Ann inspired me to try using vellum to soften the background of my card.   I love the look of it on this one and will definitely be adding it to more cards in the future.   

Stamps:  Gently Falling, Thank You Kindly
Ink: Cherry Cobbler, Early Espresso
Paper:  vellum, Early Espresso, Crumb Cake, Very Vanilla, Cherry Cobbler
Tools/Accessories: Big Shot, Square Lattice embossing folder, neutrals (or antique) brads, Cherry Cobbler seam binding

FM34: Chocolate Christmas

Lesley has a fun challenge for everyone this week at The Friday Mashup.   The challenge is to make a card using Christmas as theme or to use the colors aqua, chocolate, and white.  As always, you can also choose to Mash It Up and do both!   That's what I did for my card:
Holiday Happiness is one of those sets that I just adore.   It reminds me a bit of the infamous Charlie Brown Christmas tree I think.   I thought it would be perfect for these colors!   I added some bling (aka Dazzling Diamonds and rhinestones) to make it shiny like Christmas should be!   

I hope you'll head over to the challenge blog and check out what the other ladies created to inspire you!   I can't wait to see what you create!  

Tuesday, November 1, 2011

November Promotions


Stampin' Up! has an awesome promotion for the next 6 weeks!   From today until December 15th, workshop hostesses will receive an extra $35 in hostess benefits for workshops over $350!    Isn't that awesome?!   If you host one and your sales reach the $350 mark, you'll get the normal $50 of free products and the bonus $35 for a total of $85 in freebies!     What a deal!   (Online orders do not qualify, so you'll need to contact me to get those extras!)


In addition, they also extended the Big Shot promotion until November 11th!   There is still time to sign up for your starter kit and get the Big Shot (or $100 in products)!    I'd love to have you join me in this fun adventure, so contact me today for more details. 

Being a demonstrator has been the best thing I've done for myself in a long time.   I have lived in Texas for 9 years now and have always struggled to make new friends.    Thanks to SU, I was able to join a hostess club and find a network of people who share my love of stamping.   Once I signed up as a demonstrator, my network expanded even more and now I have even more friends!   Stampin' Up! events and my blog have also helped me make new friends from all around the world!    

In addition to friends, being a demonstrator is also helping me build up the self-esteem that I've been lacking for most of my life.   It is so rewarding to have people love your designs and enjoy learning about stamping from you.  I get so much positive feedback from my customers and always leave events with a big goofy smile on my face.    It is such a nice change from my old job where I always felt beat down when I left each day.   

Finally,  being a demonstrator and holding events allows me to pay for my own supplies and build up a nice set of tools and products.   This is a bit surprising to me because I initially signed up just for the discount with no real intention of selling anything.   I'm a horrible salesperson and I've had enough of those type jobs to know that.  Thankfully, just doing what I love, stamping, sells the products for me and I can just relax and enjoy the time I'm spending with others.   Stampin' Up! welcomes hobby demonstrators who just want a discount on their own supplies, so if selling isn't your thing, that's okay!    You still get the perks of being a demonstrator like a free monthly magazine, 20% discount on your purchases, advance copies of catalogs, preordering products from the upcoming catalogs, and access to a demonstrator only websites with lots of samples and discussions.    

There's really nothing to lose when you sign up...  You get over $400 in products for the cost of the Starter Kit and all of that is yours to keep no matter what.   I think you'll be surprised at how exciting it is to be a demonstrator and will want to keep going though.   I love it.   I just registered for a Regional event that will be held in San Antonio in January and I'm looking forward to it so much.   I will get to meet some new friends that I've come to love through blogging and email and also reconnect with other friends that I met at Convention back in July.    Being part of the Stampin' Up! family has changed my life for the better and I'm so thankful that the opportunity worked out for me.